Have you ever heard other bloggers say, “It’s all in the email list!”
I spent over 3 years hearing my husband make claims that I needed to start an email list for House of Rose. THREE LONG YEARS I didn’t listen to the man.
Mainly because I didn’t view my blog as a business or as “worthy” of anything more than an online family journal.
Finally, one day, roughly 6 short months ago, I decided to take his advice and start my “list” {as they call it in the online space}.
So today I thought it would be a good opportunity to share with you the “WHY” behind starting my list, as well as showing you “HOW” easy it is to set up.
Here’s to hoping your skull isn’t as thick as mine and it doesn’t take you 3 long years to take good advice {picture me holding a glass of wine and toasting to your wonderful thick skull.}
What is a E-mail Newsletter and Why Do You Need To Have One?
First, let me specify that I am not talking about print newsletters {although I am sure those are fabulous too}…I am going to specifically be discussing email newsletters.
First let’s address, “What is an email newsletter?”
An email newsletter is a way to offer your readers a way to subscribe to get emails from you. Those emails can contain a lot of different kinds of information and, most often, they contain additional things that you don’t include on your website. A way to give your readers a deeper insight into YOU and your brand/image/blog.
*An important thing to note is that this is completely different than someone signing up to your RSS feed. I want to make that clear. I hear this statement all of the time: “I already have an email subscription option through my RSS feed.”
Yes, that is true, if you are using Feedblitz through your FeedBurner account {or some other feed subscription service} then you do have the ability to offer your readers an email subscription. But THAT email subscription ONLY allows your readers to have your blog posts delivered directly to their inbox. ONLY your blog posts. Nothing more.
The email newsletter is completely separate from the content you provide on your blog. Let’s call it “additional content” per say.
Why is that good? Because it allows you to email your readers whatever you want to, whenever you want to! Score!
Confused yet? Pssst, this ain’t nothing compared to some other posts we have written.
Moving on…….
Are you wondering, why worry about trying to get readers to subscribe to your newsletter if they already signed up for your RSS feed?
Awesome. I wondered that same thing for three long years {insert thick skulled blogger<<<aka<<<<ME}.
The reason is simple…because you have the ability to COLLECT email addresses.
Yes, when someone signs up for your newsletter they are subscribing by entering their email address. RSS feed does not allow you to “collect” email addresses.
3 reasons why collecting email addresses is so important
I’m sure the most frequent answer you will hear to this question is: “Because the money is in the list!”
That is an expression that has been thrown around since the beginning of email-list-time. I’m not going to disagree with it completely, although I’d like to address {later on in the post} why that should absolutely NOT be the focus or the “WHY” behind starting your email list.
1| Deeper Connection with Your Readers
First things first, it’s a great way connect with your readers on a more one-on-one or personal platform. Don’t you feel way more connected to someone through email rather than through reading a general blog post?
2| It Never Goes Away
Another great thing to keep in mind is that an email list will never die! I’m sure you’ve heard my husband complain about Google’s Panda or Penguin updates {the ones that made him lose over 70% of his traffic in 2011}. Well guess what? When you collect email addresses you will always have a way to communicate with your readers…even if Google comes out with some new animal update. Ahem.
3| Money is in the List (with patience)
Let’s address the money issue. I whole-heartedly believe that the money CAN be in the list. But it has to be done right. Just like blogging, if your sole purpose it to make money? You will most likely fail.
Same goes with the list. If you are starting an email list with the sole purpose of profiting in some way? You will lose.
Your desire has to be more than blasting out affiliate links or trying to push your latest e-book. Although the email list CAN be a good marketing tool when selling things…you have to remember there has to be more to it.
In my opinion, an email list allows you to build relationships with your audience. You are able to gain their trust by offering helpful tips or tutorials. By sharing real life stories. By being transparent about your ups and downs.
Once you do that, and you gain the trust of your subscribers…then it’s not big deal if you ask them to buy through one of our affiliate links or promote one of your new books. They will WANT to help you since you have helped them for so long.
Alright, now that you see the importance of starting your email list…let me show you how easy it is to set up.
How to Start Your Newsletter
1. Sign Up For AWeber
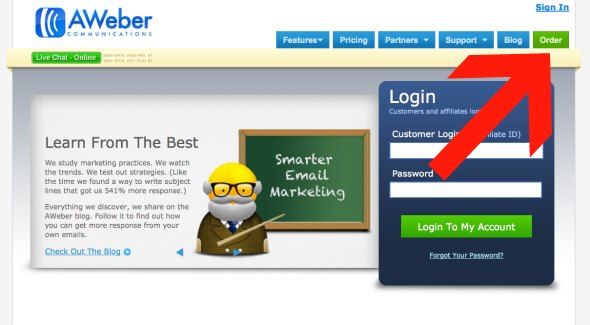
There are many options out there, but AWeber is, BY FAR, my favorite choice when it comes to newsletter subscription services. Head over to AWeber and sign up for an account.
Click “Order”
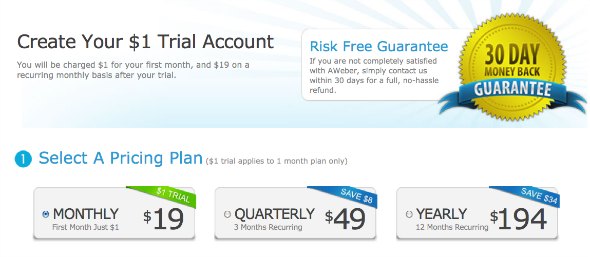
It even allows you to create a trial account for $1. How’s that for a test drive? 😉
2. Set Up Your Email List
After you register for an AWeber account and sign in you will be directed to your control panel. This is where you are going to set up your first email list. Woot woot!
You will need to click on “Create and Manage Lists” and then “Create a New List”.
Follow the prompts to enter in your personal information, including the name of your list and list description. For example, our list name would be dollarsandroses. You can name it anything you want since this is more for you to identify with then anyone else.
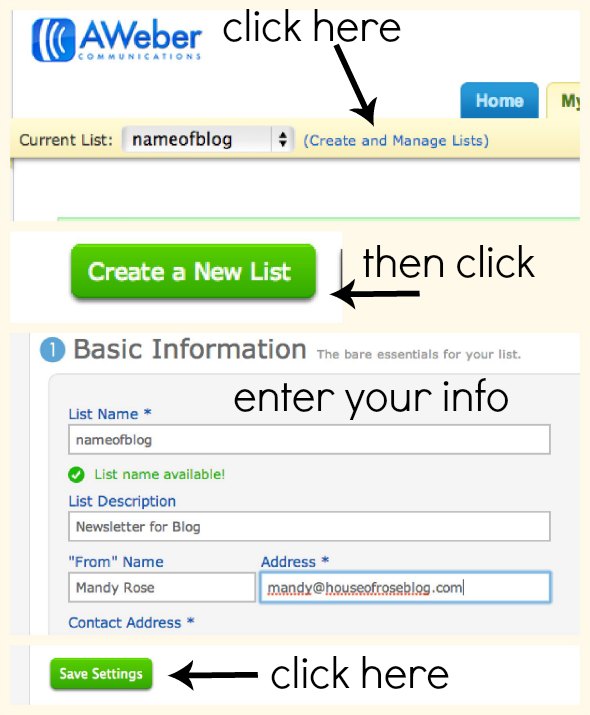
**Note: it will ask you to enter your address. The address you enter will show up on all emails that are sent out so it’s important that you know that. We use our business address so that our personal address does not get distributed. If you don’t have a business address – that’s fine, you can use your personal address. If that makes you uncomfortable you may want to consider using a different address.
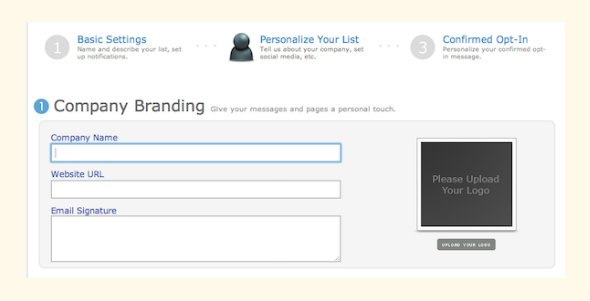
You will need to personalize your list by adding a company name {which can be the name of your blog}, website url, and email signature. It also gives you the option of uploading your logo or header.
3. Set Up Your Confirmed Opt-In Email
This is where I started getting glossy eyed. But I promise, it only sounds confusing. It’s not hard to understand. Stay with me.
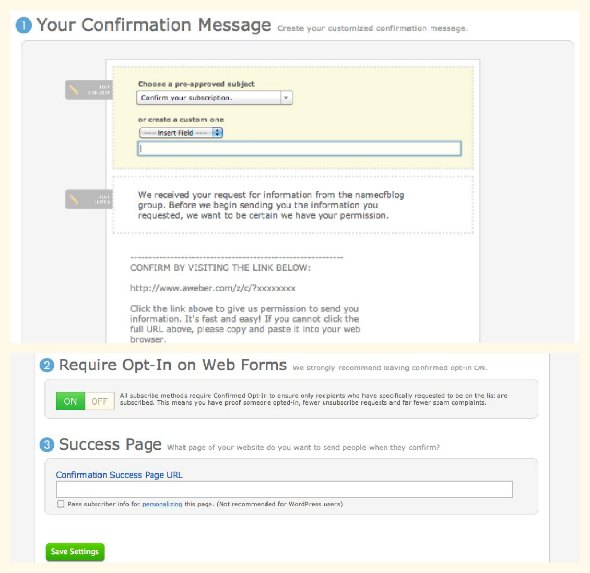
The Confirmed Opt-In email is what will get sent out to the reader immediately after they subscribe to your newsletter. There is a link in the email that is used to confirm that the person is human {and not some alien – aka spammer} and that they are interested in joining your email list.
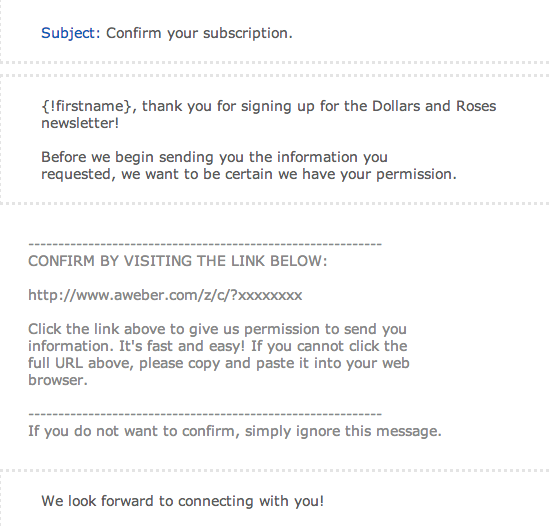
There is a template email that you can use to send out, but I prefer to customize it so it’s a little more personal.
Here’s an example of what our Dollars and Roses Confirmed Opt-In email says…
4. Set Up Your Success Page
Underneath your Confirmed Opt-In email message you will see a section called “Success Page”.
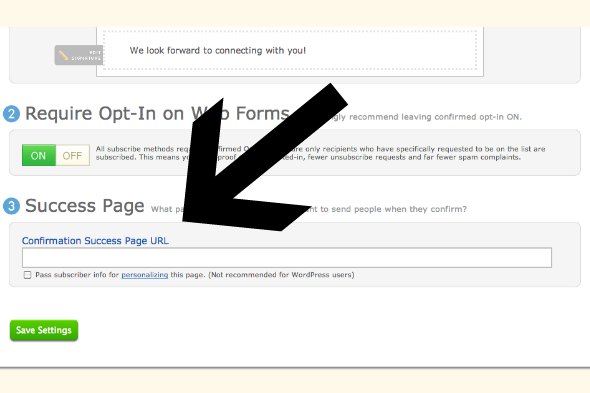
You will want to insert a URL back to your website in this space. The URL you insert here is where readers will be taken after they have clicked on the confirmation link in the email.
My suggestion is to create a “new page” on your own blog. The new page should welcome the reader to your newsletter and thank the person for their confirmation. You also may want to ask the subscriber to “white list” your email address so it will not be blocked by spam filters.
I also like to link to my most popular articles and to my social media pages. You can see an example of my House of Rose success page here.
5. Create a Follow Up Message
Understanding a Follow Up message is easier than it sounds. Think of a Follow Up message as a pre-written email. You can create a series of Follow Up messages that are pre-written and can be sent out in different time intervals to your subscribers. The first Follow Up message is always a welcome message that the subscriber will receive immediately after they have clicked the confirmation link.
You have probably heard these Follow Up messages referred to as “autoresponders”. Essentially, that is what they are. They are automatic emails that are pre-written, by you, and sent out to the subscribers in a time interval set by you.
Jeff currently has 30 pre-written emails set up to be sent out every 15 days. It doesn’t matter when someone signs up, they will automatically be taken through the series of emails from the very beginning. I am still working on building my Follow Up messages so I currently only have 5 pre-written emails set up. This is something that takes time to create and I would suggest adding one new Follow Up message a week to your series.
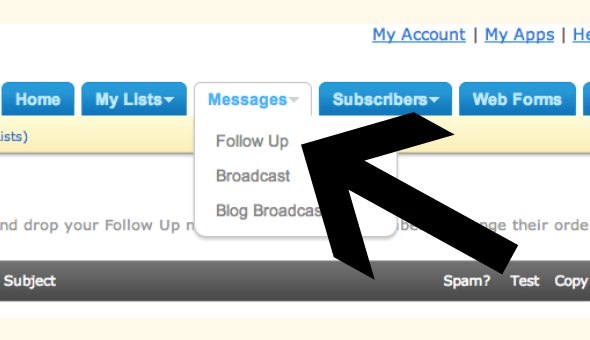
To add a new Follow Up message simple click on “Messages” at the top toolbar and then click on “Follow Up”.
Click “Add New Follow Up Message” to create your first Welcome Email.
6. Create a Welcome Email
The welcome message is essentially the very FIRST email that your new subscribers will receive so it’s important that you “welcome” them to your list.
It’s a good idea to include a thank you message in this first email as well.
You may also want to set your subscribers expectations. In other words, what can they expect to get out of your newsletter and how often will they receive it. Don’t forget to include links to your social media pages and a way for them to contact you. Remember this is all about becoming personal…so you want them to have easy access to you.
When you go to start writing your welcome message you will see that you have the choice of writing in plain text format or html format.
If you want to “spruce” up your newsletter then you will need to explore the html format. There are templates to choose from and you will also have the ability to change the font, make things bold, etc.
If you aren’t too concerned about being fancy then you can choose to write your emails in plain text. This is the preferred method suggested by Aweber.
7. Test, Test, Test…
It’s very important to send yourself a test message after you finish writing your first email. This will allow you to see EXACTLY what your subscribers will be receiving.
No surprises. Plus, this is a great way to re-read and edit your messages before they are sent to thousands. When you are under Follow Up Messages you will see the list of messages. Next to each message you will see Spam, Test, Copy, Delete.
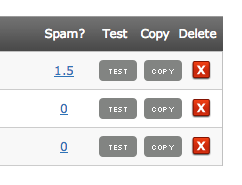
To test your message just choose “Test” and you can send it to any email address you want.
If you test it and decide that you want to change something, no fear. You can go back in and edit the message at any time. Just make sure you “Save” so that the changes will take effect.
8. Create Your Web Form
The web form or email opt-in is what you will place on your site to collect email addresses. Here is the web form we currently use for our sidebar…
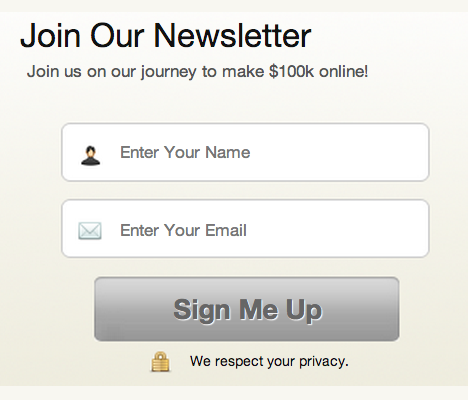
…and here is one we use on our “Income Reports” page.
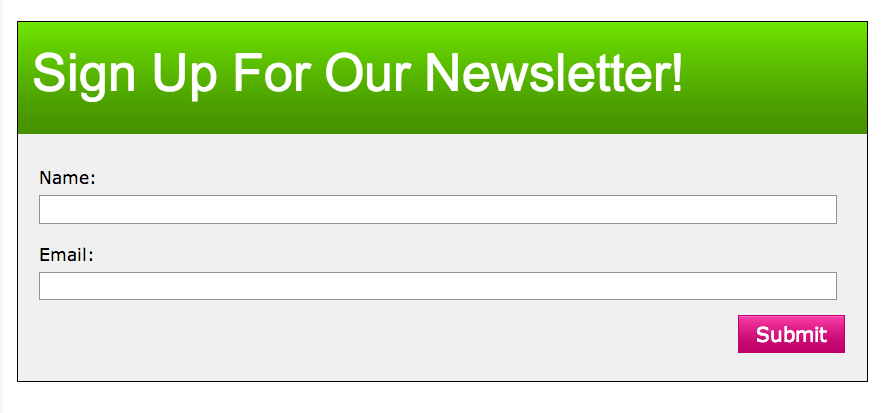
As you can see, they are both very different. That is the beauty of web forms, you can customize them however you want. Keep in mind that if you are using a web form for your sidebar then you will want it to be smaller than one you would use on a blog post or page.
Click on “Web Form” at the top of the page.
Then click “Create A New Web Form”.
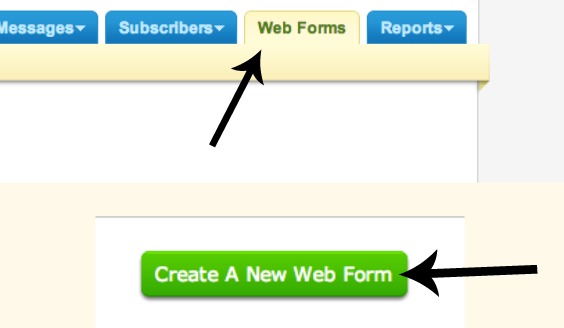
You will have the ability to choose different colors, sizes, fonts, etc. to create your own form. There are plenty of templates you can customize. My suggestion is to play around with them until you find a design you like.
Follow the prompts to customize your web form.
Once you are satisfied with how it looks then you can customize your “Basic Settings”.

You can name your form anything you want. The purpose of the name is to help you keep track of the different forms you create. Under “Thank You Page” you can choose “Custom” and direct people to the URL of the thank you page you created earlier. Remember? 😉
If you’ve been slacking {ahem} and haven’t set up your thank you page yet then you can choose “Basic Version” and Aweber will send them to a generic page that lets the subscriber know that an email will be sent their way that contains a confirmation link they must click in order to verify their subscription to the newsletter.
9. Grab the Code
You have finished designing your web form, customized your basic settings and now you will need to grab the code that you insert into your site that will allow your form to be visible to your readers.
Please do not only read “code” here and X out of the screen. It’s SIMPLE. Pinky promise.
Even if your degree is not in html coding.
Under the “Publish” tab click on “I Will Install My Form”.
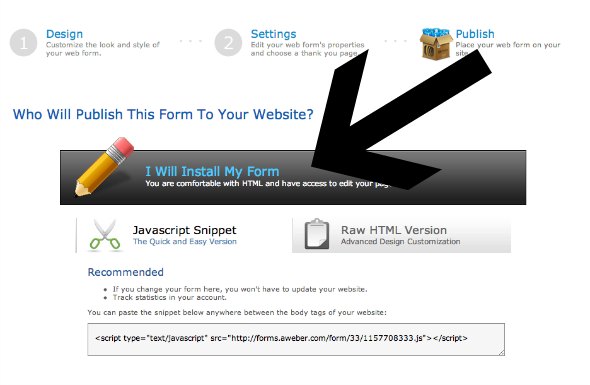
You will have the choice of grabbing the “Javascript Snippet” or the “Raw HTML Version”.
I would recommend choosing the “Javascript Snippet” because if you go back to Aweber and update/change your forms, it automatically updates on your site without you having to reinstall the code.
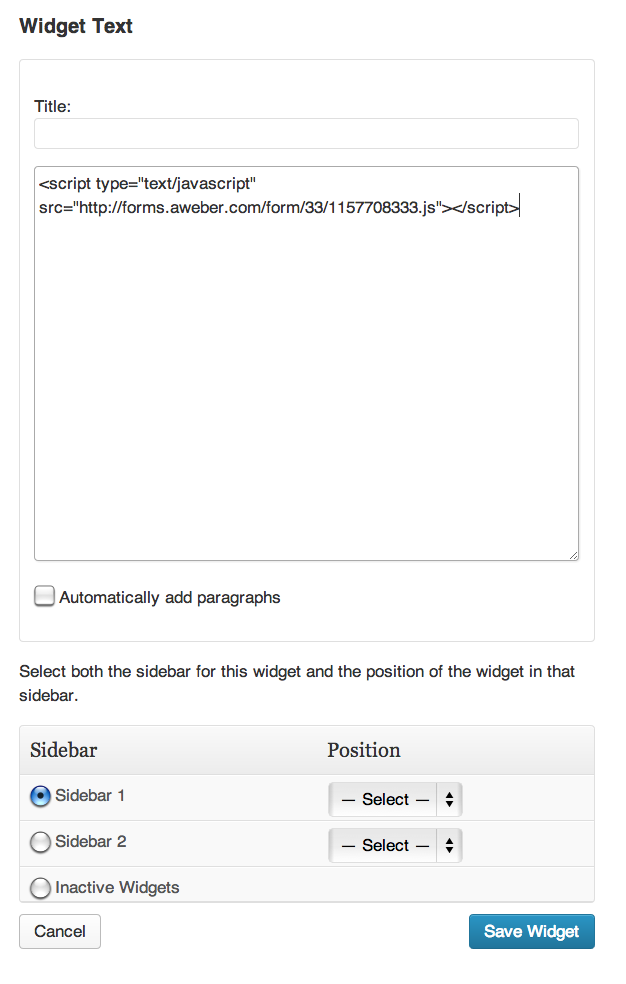
Copy the code that looks like this:
You will want to paste this code in to your site wherever you want your web form to show up.
Here is how to install it if you have a WordPress Blog.
If you want the web form to appear on a certain page or blog post then paste the code into the Text tab for the post/page. The Text tab is right next to the Visual tab in the right hand corner of your post/page.
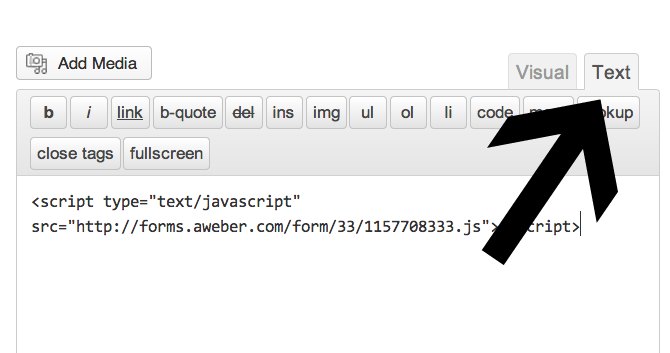
If you want the web form to show up in your sidebar than you will need to paste the code in to a “Text Widget”.
*Tip: If you want the web form to be centered, just add <center> to the front of the code and </center> to the end.
PHEW! Are you exhausted yet?! You can relax now because YOU ARE DONE!
Trust me, you will be so happy you set this up.
Start growing your list!
Interested in trying out AWeber? Sign up for a $1 trial account now.



Mandy,
This is so timely. I stumbled on your home blog through a Shabby Nest link party, clicked over to this blog and was completely inspired to at least investigate the idea of combining a passion for recording our life, inspiring others to do projects and rant randomly. I also homeschool which is a topic that can never be exhausted. Thank you for this detailed post.
BTW I so would have supported your campaign to have dinner with Jon Acuff and Dave Ramsey but had already purchased the book after listening to the live launch event. (If I can still promote you, let me know). Hope you win. You and Jeff have something here with helping people combine their passion with earning an income-so in line with what Acuff talks about.
Go you.
Thank you so much for this! Building an email list is something I’ve had on my to-do list for a long time but it has been to confusing/exhausting to think about. This post has brought me a little closer to tackling it for myself.
Would you consider at some point blogging about what you should include in a newsletter to make it worthwhile for your subscribers?
Thanks again! – Julie
Absolutely, Julie. Sounds like a good topic. 🙂
Great advice.
This was one of the first things I do on my website no matter how many readers I have.
I do this because the connection with your readers improves with the usage of a list. You feel special when you get an email from someone . It could be something just as easy as thank you for signing up.
I actually try to send a personal email to each new person who signs up.
It helps to create a great first impression. I know when it has happened to me. I’m like,”wow.”
Once you have created your list, the next thing should be an autoresponder series, but that is a whole other post.
Nice work.
You know, I’ll admit … I’m still totally on the fence about the email list. My email subscribers get Feedburner emails. And I feel like my readers get a personal connection to me, just by reading my blog posts. (Many of them reply to my emailed-out blog posts). Plus I see big blogs like The Simple Dollar use Feedburner emails.
I’m not saying that to be contrary or argumentative — I’m saying it because I genuinely want to understand why an email list (outside of Feedburner) is important. I’ve heard the vast majority of bloggers speak highly about their Aweber lists, so I’m convinced that many, many bloggers believe that its important to have one. But I think I’m suffering from thick-skull syndrome, because I just can’t figure out why.
@ Paula I fought it for years, too. Here’s a couple of things that I realized with my own blog/community.
1. Emails are much more personal. Many people are as comfortable sharing their stories or asking questions on a blog post. My first couple of emails share stories and ask questions. Some are so long and personable that they could be their very own blog post. In fact, this is one: http://www.goodfinancialcents.com/wanting-change-success-story-in-making/. When people started replying to these emails I noticed an immediate deeper connection with my readers. And the best part about my email is that it’s an autoresponder. 🙂
2. Quick Feedback. Recently I was deciding on my book cover. Facebook and Twitter helped, but I needed something more direct. Enter email address. Using Survey Monkey and my email list, I was able to get over 600 people give me their favorite choice.
3. Instant sales. As they say, the money is in the list. With our Dollars and Roses email list which is still in its infancy stages, we were able to email our list about a promo that Lunar Pages was having on their hosting package. It was a 50% discount but only was available for a few days. Using our list we were able to make over $400 from that one email. (See February Income Report) I apply the same strategy with autoresponders for my Good Financial Cents list where I’ll occasionally highlight certain companies that I’m an affiliate for (Savings account, brokerages, etc).
Those are just a few of the reasons that I’ve been able to see value in having an email list.
Thanks Jeff! How funny that you mention feedback — I did respond to your Survey Monkey email about voting on a book cover. 🙂
Thanks for those reasons. I’ve been thinking more about an “official” email list since I read Mandy’s post. An additional benefit, I suppose, is that not all of your blog posts need to get pushed out to your readers. You can add content to your site while sending your subscribers only the cream-of-the-crop. (You can achieve the same thing with a WP Plugin, but I guess there’s more design options and flexibility with an official email list).
Thanks again!
Hi Guys,
We have thousands of people signed up for our RSS emails. If we take the steps to create a newsletter, how would we be able to “market” so to speak to these people that we already have from RSS to try and get them on board with signing up from this new newsletter?
Hey “The Twins”, 🙂
To get people to convert to your email newsletter you could start by giving away some sort of free guide “7 Ways to Get The Best Savings Deals”. Basically, entice them with something some sort of special offer.
The guide could be a .PDF that they could download, or it could be 7 emails that outline your best strategies. Call it your “VIP List” where you share all your best deals.
That’s just a couple of suggestions. Hope that helps plant some ideas. 🙂
Hey Jeff,
Yes Yes Yes, those are some great ideas! Thanks so much!
Yes, yes, YES!
I think newbies don’t start an email campaign immediately because:
A) As you referenced, they don’t always see their blog as a business.
B) They don’t want the monthly cost of a top rate service like aWeber.
I’m with you.. and try to convey that money is left on the table if you squander the first several months.. or years!
I personally started with a cheapy service and then tried to move my whole list to aWeber once I realized the difference.. but of course I lost a lot of peeps doing that.
Just stumbled upon this blog. Darlene 🙂
p.s. you may have mentioned thi..s but if you get stuck with anything, you can pick up the phone and a friendly aWeber person will spend all the time you need to work it out!
@ Darlene
Thanks for stopping by and glad you found our blog. 🙂
Thanks for sharing your tips/experience with email marketing.
So glad I found this post, I am a newbie and was told by another blogger thatbI need to start an email list but I had no idea where to start.
@ Tammy Glad you found it helpful!
I’m looking carefully into building my own email list. Thank you for stressing how valuable this is to an online business and providing a detailed guide to how to do so through AWeber.
However, since I’m a blogger just starting out with just a tiny trickle of income coming in through the blog at this point I’m reluctant to spend much money on services for the blog at this point. That makes AWeber’s rate of $19/month for up to 500 subscribers look expensive. Now, I understand quality doesn’t come cheap but I’d rather look for alternatives than take on expenses my blog can’t yet handle on its own.
I found a free WP plugin called “Wysija” (What You Send Is Just Awesome) which handles newsletters and such. It requires a choice to be made on from where emails for your list are sent. I can choose my own web host, Gmail, or an SMTP provider.
Thank you so much! I don’t have Aweber, but I have been so stressed out trying to figure out how to put a webform on just a certain post. I don’t know much about coding, so I need step-by-step instructions showing me how to do things. This was exactly what I needed!