A few weeks ago I bought an already existing site for the first time. Another blogger was wanting to unload on the site and I thought it would be a good pick up to help out with some of my other online projects.
Transferring the funds via PayPal, buying the site was very simple. The one thing that didn’t cross my mind until the transaction was nearly complete was,
“How in the heck do I get the site on my website host?”
Having never bought an already exsisting site, I was clueless on how to proceed. The site owner suggested that I contact Jesse Michelsen from AntiNecktie to help me get it transferred over. Done!
Jesse made the process seem uber simple. Because of that, I solicited him to write up this post that shows you step by step how to do it.
In the event your lazy like me, feel free to contact Jesse and I’m sure he’ll be happy to help you out. 🙂
Enter Jesse…
*******
For every blogger, there comes a time when he or she has to change web hosts. This task sometimes comes from selling your blog, or outgrowing your current host which are both great problems to have. Whatever the case may be, this tutorial should come in handy to all you bloggers out there.
First, let’s talk about what a WordPress Install consists of:
In a WordPress blog, you’ve got the WordPress PHP files – These files are downloaded from WordPress.org manually or by using one of your hosts SimpleScript or similar installers, are installed on your server in your web directory and get served up by your web server. They are the core of your WordPress site.
Then there is the WordPress MySQL database – Without your database, the WordPress core files can’t serve any information. This database houses everything about your blog, all your posts, your usernames and almost all your settings.
Next up is your domain name – Your domain name points to the IP address of your server. This is controlled by the Domain Name System better know as DNS records. You will need to redirect your DNS record to your new host, so your domain name is pointing to the right server out there in Internet land.
There are some minor details in the mix, but changing these three things; your WordPress PHP files, MySQL Database and DNS records are necessary to move your WordPress site from one host to another.
Let’s get down to the details.
We need to collect all the information you’ll need for the move. Here’s a quick list:
- Old host cPanel (or alternative control panel) credentials: You need to be able to access your files on the old host.
- Domain registrar credentials: if your domain is registered through a third party such as Godaddy, you’ll need these to change the DNS records.
- New host cPanel credentials: as with your old host, you’ll need to be able to log in and upload the WordPress PHP files and MySQL database backup to the new host.
Important: I almost always do this kind of job in the middle of the night so there aren’t any noticeable interruptions in service. Things can and sometimes do go wrong when moving hosts.
Okay, let’s get started.
Log into your current host via cPanel. Typically you can reach your cPanel login area by going to yourdomainname.com/cpanel.
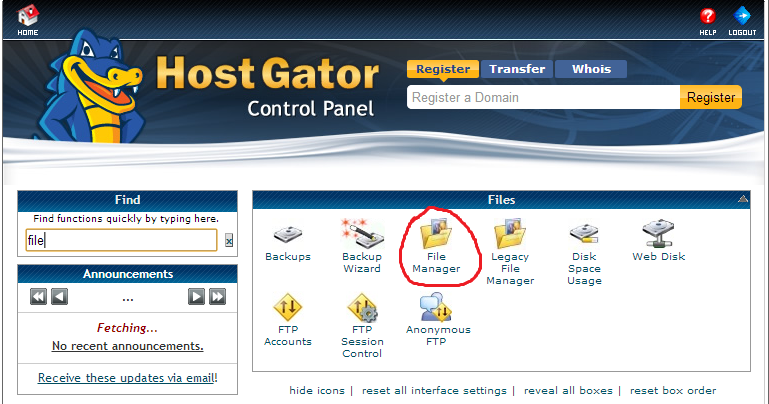
Once you log in, you should see a “Find” box near the top on the sidebar. Start typing in that box and you’ll notice your cPanel options start to get narrowed down to only those that contain the text you typed in. Type “file’ to get your File Manager options and click on the File Manager.
After clicking File Manager, you’ll get a pop-up that asks where to launch the file manager. Select Home Directory and click Go.
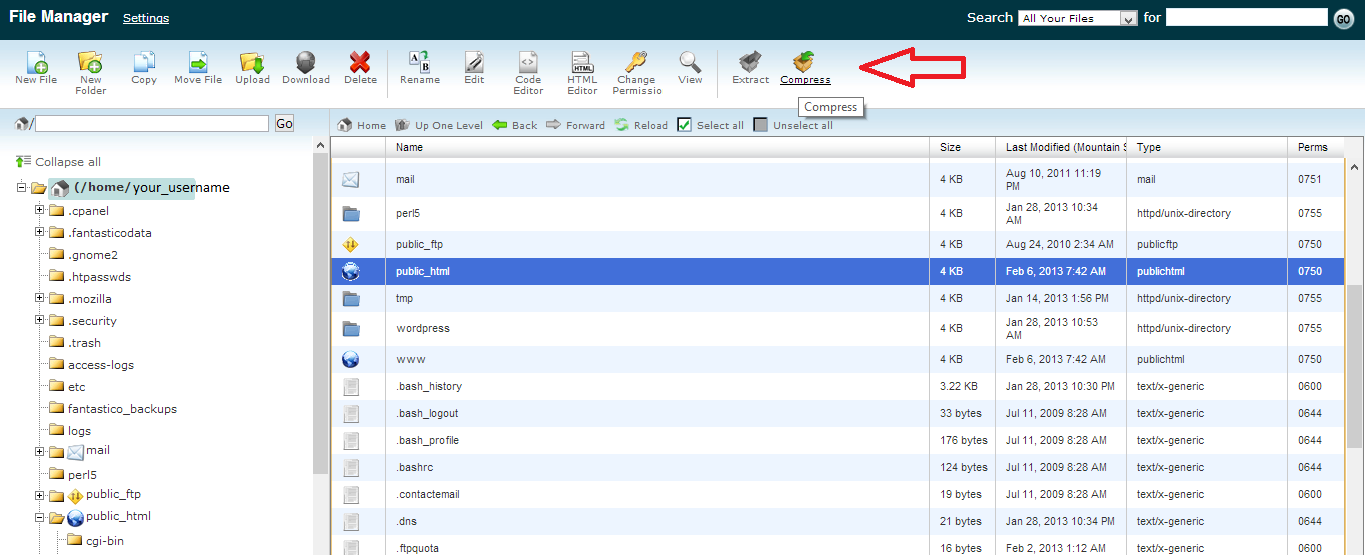
In the File Manager, you have two panels. One on the left is the directory structure tree where you can select locations to view. On the right side is the view panel that shows you the folders and files in the directory you’ve selected on the left. Since we elected to open the File Manager to your home directory, you should already have your home directory highlighted in the left side panel (eg “/home/yourusername”) and the contents of your home directory including your web directory (public_html), in the right side panel.
Highlight your public_html directory in the view panel by clicking on it and then click the Compress button in the menu bar of the File Manager. What this will do is make a compressed copy of your web directory that you can download much easier than downloading individual files and directories. Choose your compression format (default .zip is fine), the file location and name (again the default location and name work just fine here), and click Compress Files.
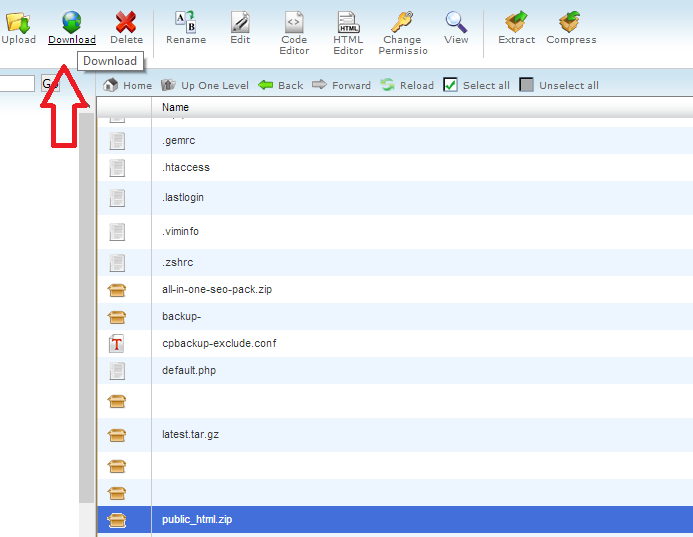
Once the compression is finished and you hit Close on the compression results window, you’ll have a new file called public_html.zip in your home directory. Click on this new .zip file in your view pane and click the Download button in the File Manager.
Tip: Before leaving the File Manager, there is one more thing to do now that will save us time later. Locate your wp-config.php file in the view pane, located within your public_html directory and click Edit in your File Manager menu. Inside the wp-config.php you’ll find all the information for your MySQL database including the Database Name which we’ll need very soon. Note that down somewhere.
Time to Backup
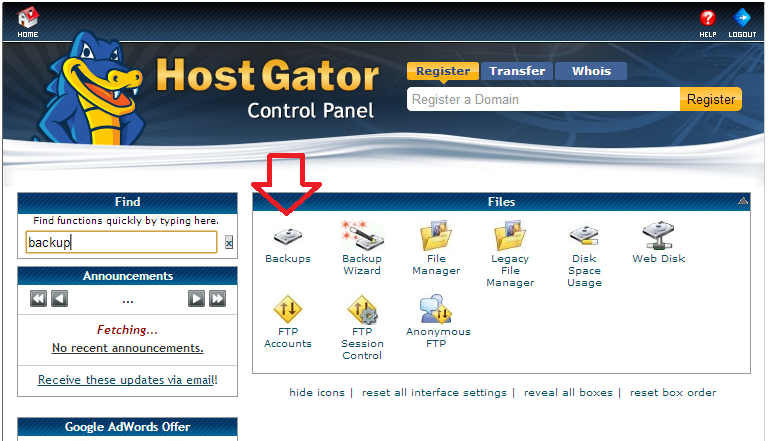
That takes care of your WordPress core files but we still need to back up and download your WordPress MySQL database. Since we are already logged into cPanel, the easiest way to do this is by using the cPanel Backup feature. Go back to your cPanel window (the File Manager should have opened in a new tab/window. If you don’t have the cPanel window open anymore, navigate back to yourdomainname.com/cpanel), type “backup” into the Find field and click on Backups.
Note: You’ll probably notice you can back up your home directory and full account here too, but the way we did it via File Manager is generally quicker when moving hosts. However, if you are cancelling your old hosting account, I recommend doing a Full Backup from the Backups section for historical purposes in addition to the partial backups we’re using to move to a new host.
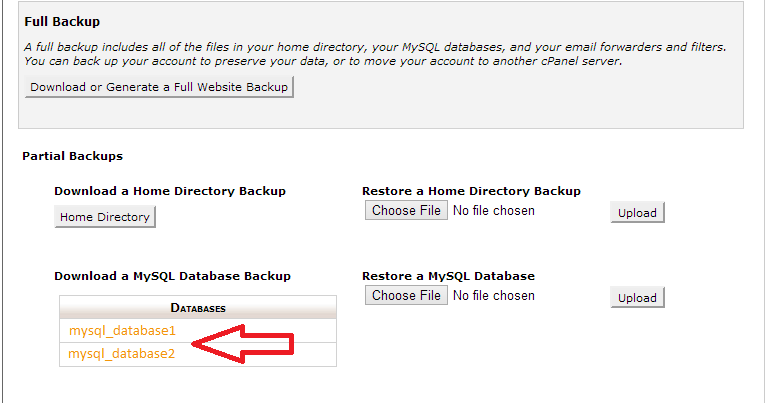
Scroll down under Partial Backups and you’ll see “Download a MySQL Database Backup” as well as a list of the current MySQL databases. Clicking on any of these database names will download the database backup to your computer. Download the database for the website you’re moving. Remember, we noted the database name from the wp-config.php file earlier.
Tip: As soon as you download your MySQL database, it’s a good idea to change your old wp-config.php file via the File Manager so that your website isn’t adding/updating information in the database anymore. Merging database backups is not fun.
You now have your WordPress core files and your MySQL database backup that can be moved to your new host and restored. Let’s continue.
Note: At this point, you have not pointed your domain name to the new host so to access cPanel, you’ll need to locate the direct server URL sent to you by your hosting company in your “Welcome” email. Alternatively, if you assigned a second domain name to your new host account, you can use that domain name to access cPanel.
Time to Upload
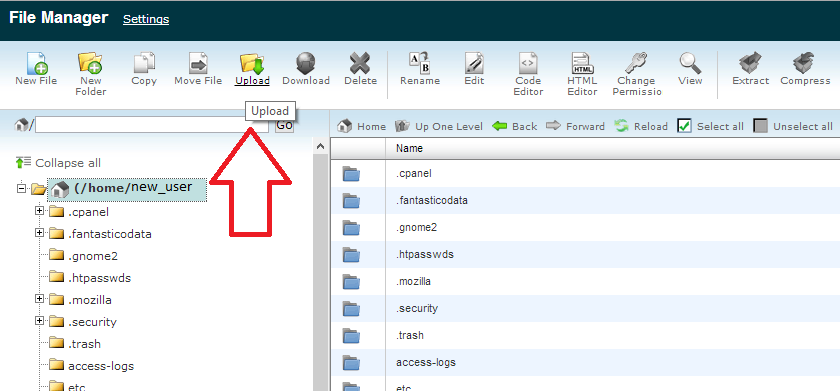
Log in to your new host via cPanel. Type ‘file’ into the Find field and click on File Manager. Once the File Manager is open to your home directory as we did before, click Upload in the File Manager menu bar.
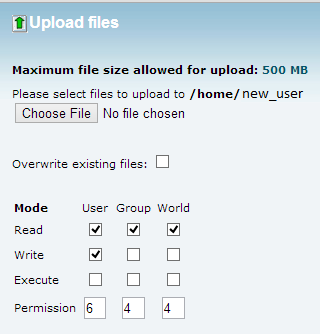
That will bring you to the Upload screen. Click Browse here and select your public_html.zip file that you downloaded from your old host. The upload will begin automatically and an “Upload complete” message will appear in the bottom right corner when the upload has been processed.
Caution: Before going any further, take a look at the directory structure in your File Manager. Is there already a public_html folder in the home directory? There should be. Verify that it is empty (or only contains a cgi-bin directory) and that it is where you intend to place your WordPress core files from you old host!
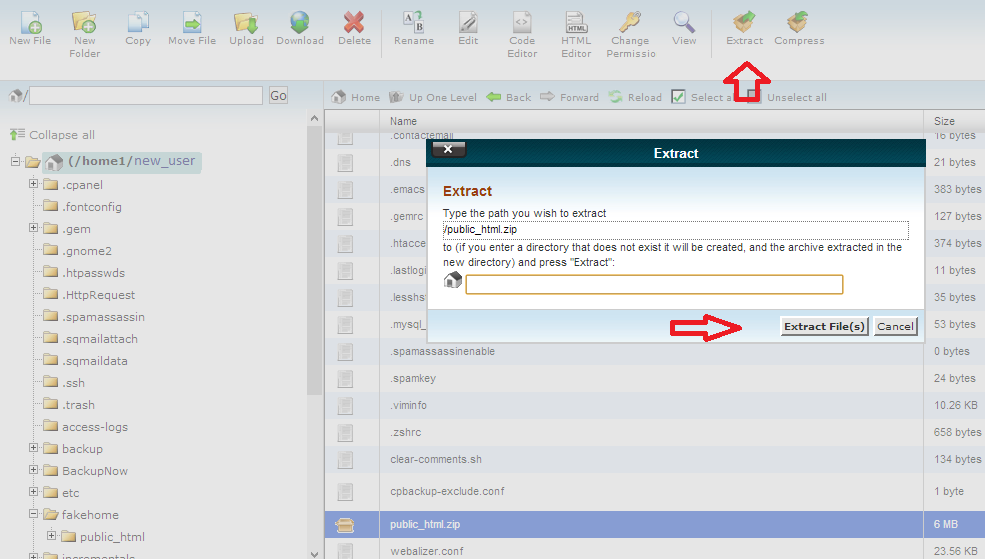
Once the upload is finished, you should see the public_html.zip file in File Manager, in the home directory of the new host user. Select public_html.zip and click Extract from the File Manager menu bar. This will bring up a dialogue box that allows you to choose where to unzip the file contents. We zipped up the entire public_html directory on the old host, so you’ll want to extract the zip into the home directory and it will put your WordPress core files into the existing public_html directory on the new host. Please reread the caution above to insure you don’t overwrite important files.
Verify that your public_html directory is full of your old WordPress core files now. This can easily be done by checking the wp-config.php file under your public_html directory on the new host. If the database name in the wp-config.php file matches what you noted down from the old host, the old public_html.zip has been extracted into the right place.
Restore Database
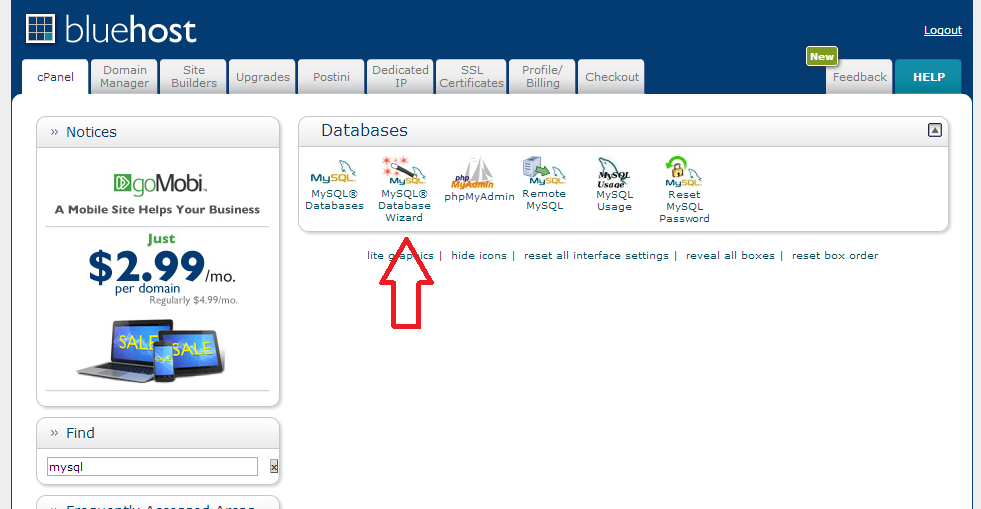
Now you need to restore your MySQL database onto the new host. Go back to the cPanel home on the new host and type ‘mysql’ into the Find field. We have to create a new database before we can restore the old database backup. Click on MySQL Database Wizard.
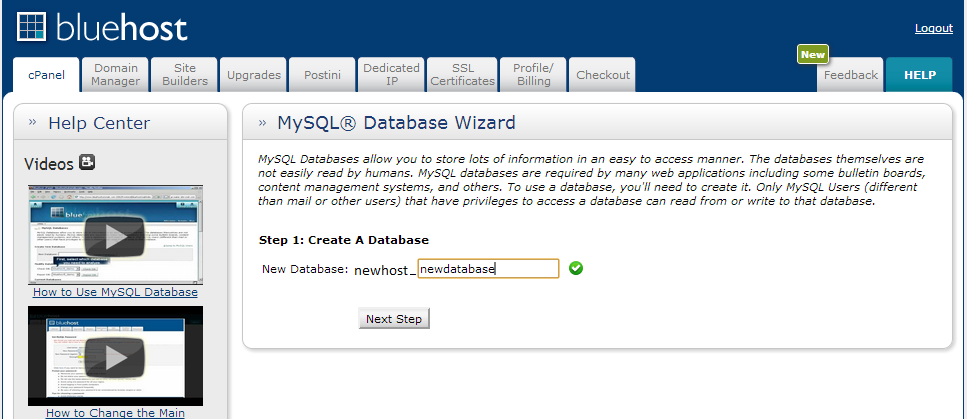
Enter a new database in the provided field and click Next Step
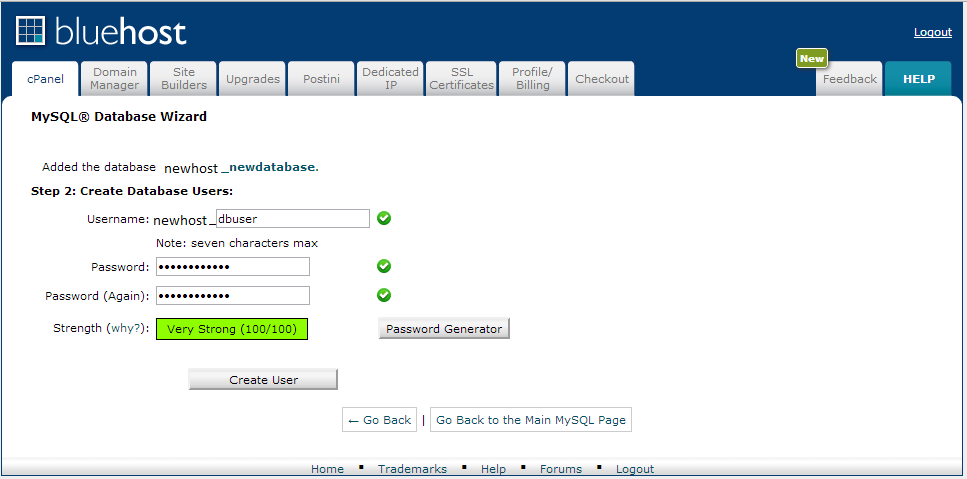
Now you need to create a new user for this database. Enter a username and password into the boxes and click next. Tip: For better security, use the password generator provided on the Create User screen.
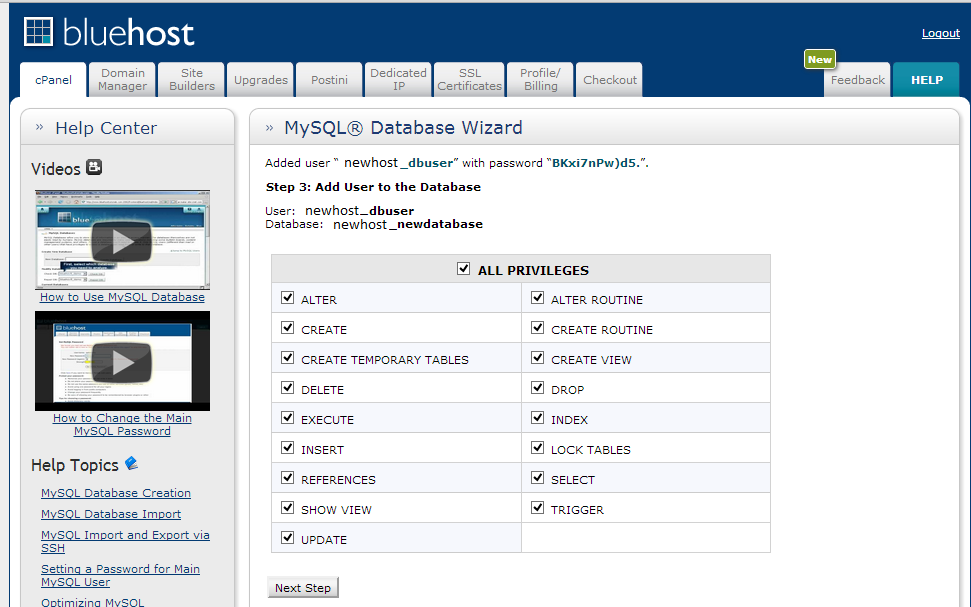
On the next screen, note down the database name, username and the password you created. You’ll need these very soon. Select the All Privileges check box on the screen and click next to finish the database creation.
Now go back to the cPanel home page and type ‘mysql’ into the find box again. This time, click on phpMyAdmin in the results. We’ll use phpMyAdmin to import our old data into the new database.
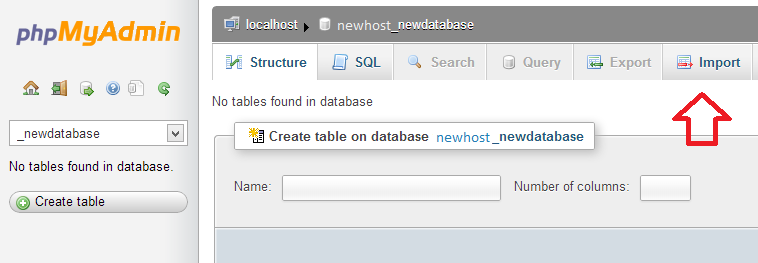
When phpMyAdmin open (you may have to log in here. Use your cPanel credentials at the login prompt if it appears) you’ll notice the interface is similar to the File Manager with a list of databases on the left and your view panel to the right, with actions you can perform on the databases. Select your new database from the list on the left, and click Import from the view panel on the right.
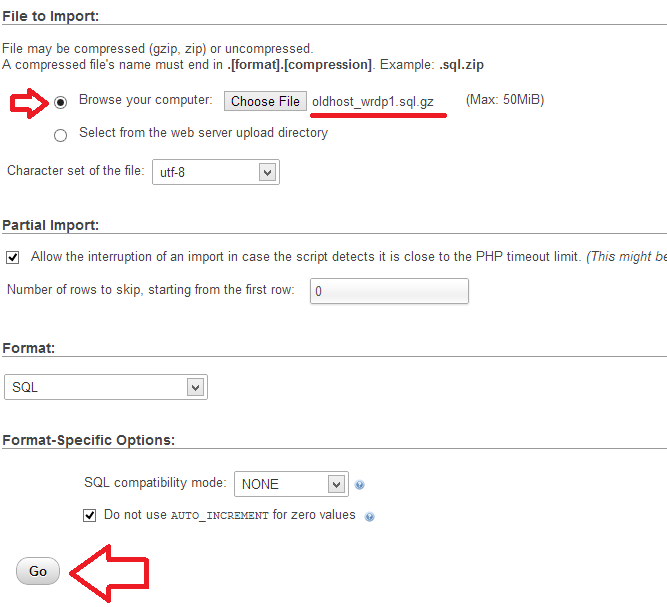
Leave the options on this page as the default. Click Choose File on the Import page, browse your computer for the database file you downloaded from your old host and click Go down at the bottom.
The upload may take a minute but you’ll get a success message at the top of the import page when it is finished. Close phpMyAdmin.
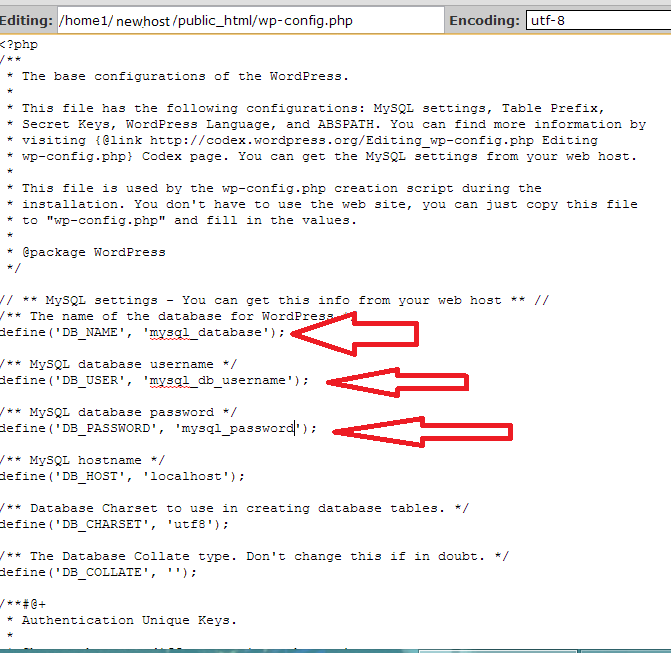
Now you need to connect your WordPress core files to your new MySQL database via the wp-config.php file. Open up the File Manager again on the new host, select the public_html directory in the left side directory tree, and locate the wp-config.php file in the view pane. Click Edit in the File Manager menu bar.
Here you’ll need to change the database name, username and password to match that of your new host. Remember, you noted these down earlier when we created the new database and user.
That just about does it for the move. Your WordPress core files have been moved to the new host, your MySQL database restored and everything is in it’s proper place. Oh but wait, we can’t forget to point your domain name to the new host!
Test, Test, Test….
First, it’s always best to test your new install to make sure it works. Since there isn’t a domain name assigned to the new server you have a couple options. First, if you got a ‘Welcome’ email from your host with a temporary URL to access your web files, use that to see if your site appears on the temporary URL. If you added your side as an addon domain, you’ll also have a temporary URL you can use (only available on some hosting platforms). If so, you can skip the next part of this guide.
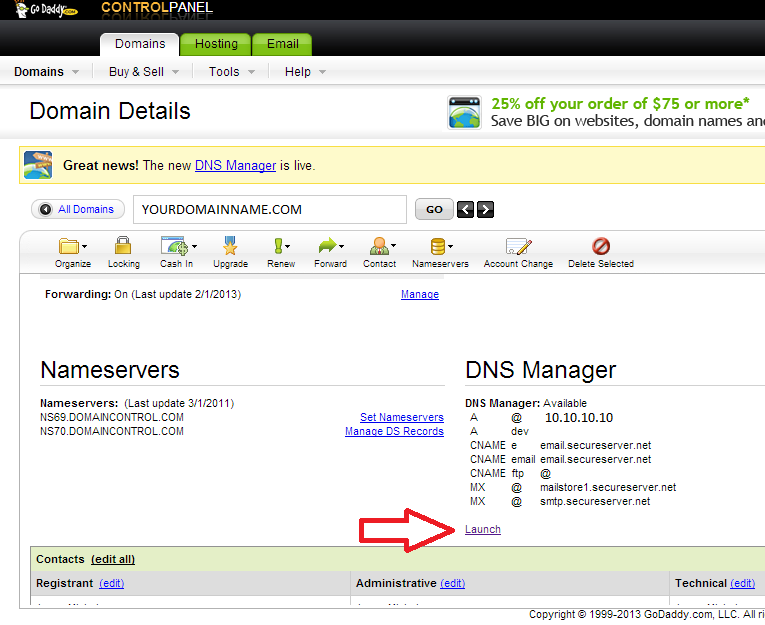
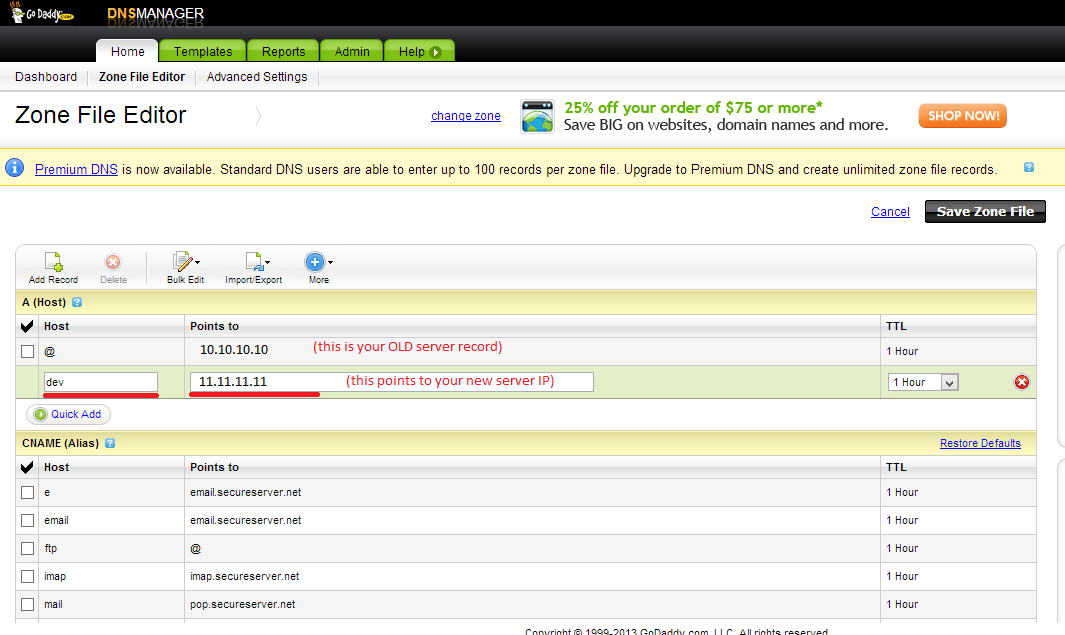
The easiest way to test things is to assign a temporary A Record to your new host server through your DNS provider, also called a Host record or Address record. To do that, log into your DNS provider, most commonly your domain registrar, and navigate to your DNS Management interface, sometimes called your Zone File or Zone Editor.
You’re going to add an A (Host) Record and there are two fields required. First, the host name of the A record. This is assigning a subdomain to your domain. A subdomain comes before your domain name. For example, I like to use ‘dev’ as a subdomain for testing. You would type this into your browser as ‘dev.yourdomainname.com’. The second required field in the A record is the address or the Points to… field. In this field you’ll need to put the IP address of your new host web server.
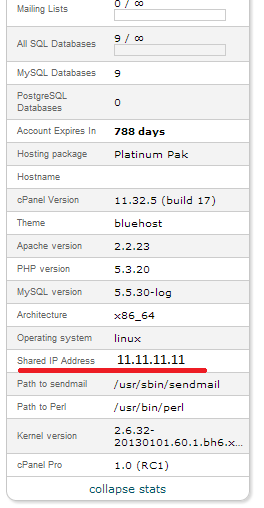
To get that IP address, log into cPanel on the new host server again and look at the status bar or Stats bar running along the side of your control panel. In it is all sorts of info about your server including the shared IP address.
A (Host) Record propagation may take up to 2 hours but I can usually access a subdomain within minutes of it being created. If you get a 404 error when going to your new subdomain, give it a little more time.
If you navigate to your new subdomain now, you should see your website.
Note: Clicking anything on the page will usually redirect you back to your live site without the subdomain as WordPress hardcodes your domain name throughout your web pages. Don’t be alarmed, you just need to finish the final step of the process.
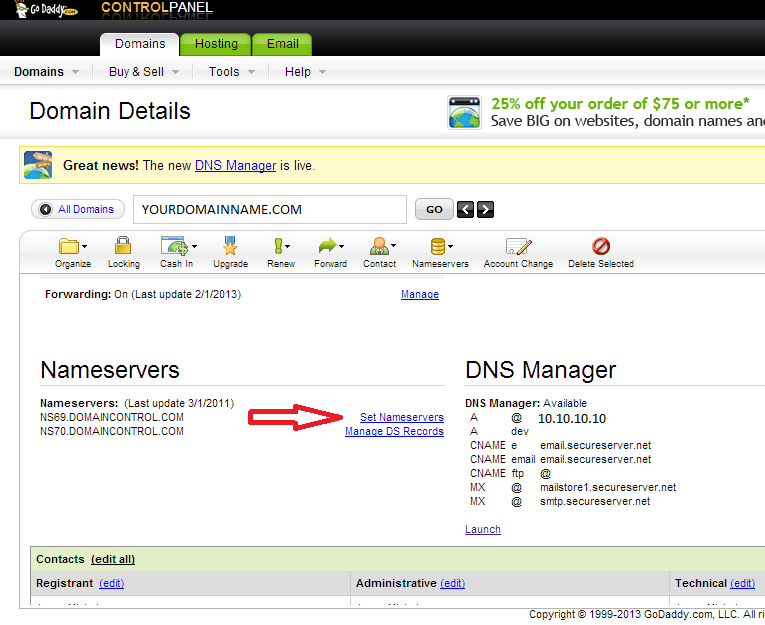
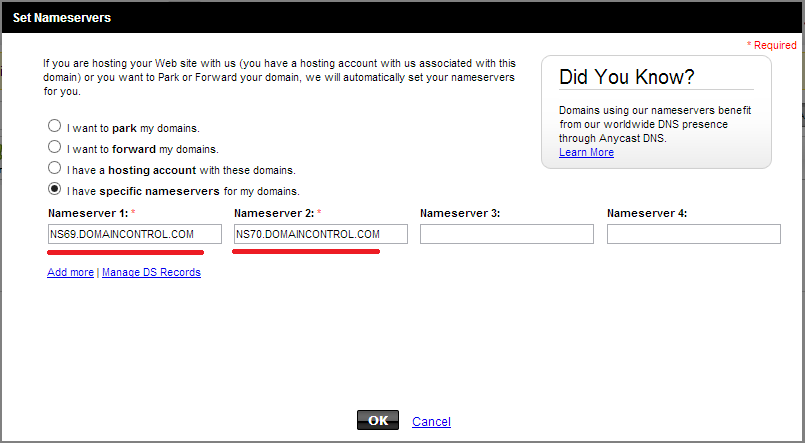
Now you can change your domain name to point to your new server. The proper way to do this is to change the nameservers for your domain to your new host’s nameservers. Your nameservers can usually be found in your ‘Welcome’ email from your new host or in your control panel.
You can also change your main A (Host) Record with the name ‘@’ to point to your new server’s IP address just like you did with your subdomain instead of changing the nameservers but I consider this a temporary solution. Some hosts required your nameservers to point to them, not just A (Host) Records.
And that’s all there is to it! Details will vary between hosts and domain registrars but most of these steps should translate without much fuss between most of the hosts and registrars out there. cPanel is one of the most widely used control panels and the other control panel solutions available are very similar.
If at any time during this process you get lost or overwhelmed, (there’s a reason I suggested doing this during the middle of the night) you should search in your host Knowledge Base or contact a professional to help you with the process.
Jesse Michelsen is a freelance writer, developer and system administrator. He can be found on twitter, writing for one of the Jestem sites or at his new entrepreneurship blog, AntiNecktie, where he shares small business and freelancer tips.






Hey Jeff, thanks for letting me write this up for you.
I hope you all find it useful and if anyone has any questions, I’m happy to answer them here in the comments or in private via email.
WOW, thank you for the awesome step-by-step, Jesse! I’ll still probably hire you to do it every time, but this post is definitely amazingly detailed!!!
Probably? Ouch 😉
Thanks so much! This is exactly what I need because I’ve been pretty lost trying to figure it out!
Happy to help!
Hello,
Love the tutorial, but had a quick question. I just purchased my site through godaddy and I purchased hosting through bluehost. The problem is I can’t transfer the domain for 60 days. Is it worth it to go ahead and build the site through godaddy and then transfer it in July? Or should I just wait until then and transfer it over?
Thanks in advance,
@ Christina
You could do either one just depends how comfortable you are moving sites between hosts.
Although I buy all my domains through GoDaddy but have them hosted elsewhere. I assume you’re saying you bought a hosting package through GoDaddy?
Thanks a lot for this incredible and easy step by step transfer. As I’m testing a new webhost, I don’t want to redirect right away the dns server of my domain name. How can I insert then IP address in WP before I redirect the domain name to the new webhost?
Thanks for whole process, my old cpanel was from different host but your article clearly guide me to transfer my site.
I can’t begin to tell you how useful this post was. I’m moving from HostGator to MediaTemple — which involved a $150/site moving fee (and I had five!). It’s been a huge learning curve, and I’ve spent the better part of two days doing this, but if I ever had to do it again, I’m sure it’ll be a breeze! A couple of suggestions:
Upload/download of the HTML files: While creating a ZIP file of the /public-html folder on the source server is a great idea, downloading it and re-uploading it on the new server was a real pain. My files for all five websites was totalling to a little over 2.4 GB. While downloading happened super fast, uploading was REAL SLOW and even after leaving it all night did help. I found that logging into SSH on the new server and using the following command made it happen in a JIFFY:
wget -c http://www.domain.com/filestomove.zip
and then:
unzip filestomove.zip
Second, I kept getting an error when I was trying to import the database that I had exported using the “backup” approach. I found that going into MyPHPAdmin and “exporting” the database from the source server, and then “importing” the database int he new server happened without any errors.
All in all, GREAT post — I am a total non-techie but I think I can now hold my own. Thanks again!
thanks for the great walkthrough.
Just thought I’d mention that I’m about to launch my new service at migrately.com which will help those folks who can’t or don’t want to move their site themselves.
The service will focus purely on moving WordPress websites from one host to another. Nothing more or less than that. It will also be priced competitively!
Launching soon, but there is a sign-up page at the above address where folks can register for more information.
Thanks again for the post!
Hi, Jeff Rose
Thanks so much! This is exactly what I need. From few days i have been trying to transfer my wordpress website to another hosting but i failed. But now i learn from this article exactly how to migrate.