*Author and House of Rose Contributor – Jessica Philippo, from One July Living.
Make sure and read the first post in this series: 3 Steps to Better Pictures – Without Changing a Single Camera Setting.
Before I began my photography journey there was simply morning, day, and night. In the day, the sun filled my home. At night, the lights came on. Simple enough.
And now? I see the world completely different. I notice way the sun comes through my daughter’s nursery in the morning. The way it filters through the trees in the afternoon. The “golden hour” created just before sunset. The way a lamp illuminates and casts shadows across my grandmother’s face while she prays at night.
I chase light. I crave it. Because I am a photographer, and light is my paintbrush.
And today is the day that YOU will begin to see light in a whole new way.
As I mentioned in my first guest post, and you’ve likely heard before– shooting in manual mode is a game changer. But to learn manual mode, you must also learn light.
Today we are going to explore how to use manual mode on your camera.
So what exactly do manual mode and light have to do with each other? Let me introduce you to your new best friend, the Exposure Triangle.
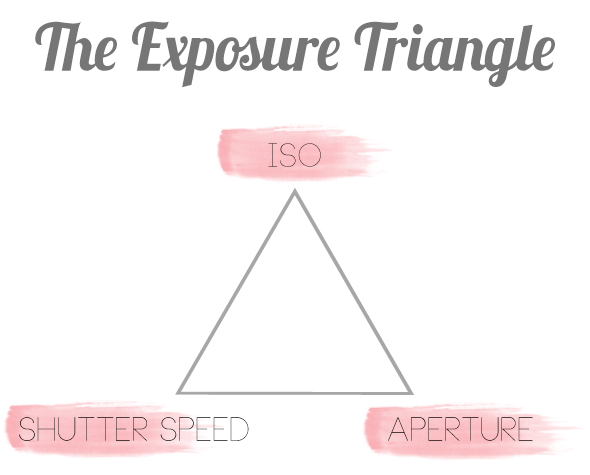
Manual Mode is all about evaluating the light available to you, and adjusting these three settings in your camera to determine how you will approach your ideal exposure.
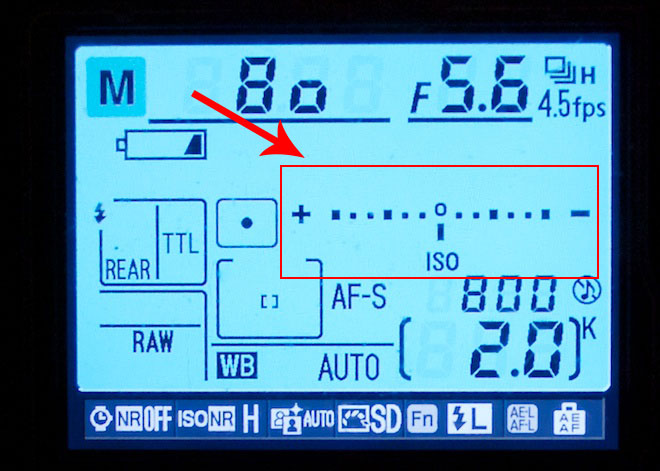
What does ideal exposure look like (we’ll talk more about this in a future post)? Something like THIS when you peer through your camera…
Now, I’m going to throw A LOT of information at you today. But that’s why this is a SERIES! We will revisit each of these areas in more detail in the coming months. But first, we need to understand the Exposure Triangle as a whole.
So today, let’s quickly break down each of the elements.
One of my best friends stopped by the other day and totally fell into my trap an opportunity be a model for all you fine folks.
INTRODUCTION TO ISO
This number represents how sensitive your DSLR’s sensor is to light. The higher the number, the more light it will collect. On most entry-level cameras, the maximum ISO setting is typically around 1600 (and goes higher as the quality of camera improves).
Here’s the catch … the more you raise the ISO number, the more grain (referred to as “noise”) you will introduce to the image.
General rule of thumb…you want to keep your ISO as low as the situation will allow in order to produce the best quality image.
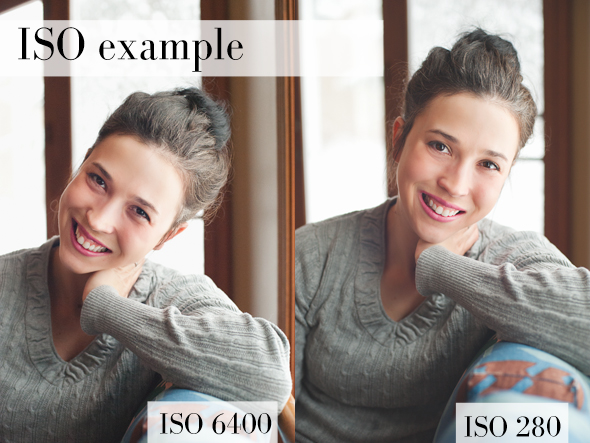
Left Image Settings: ISO 6400, shutter speed1/640, aperture 4.0
Right Image Settings: ISO 280, shutter speed 1/125, aperture 2.8
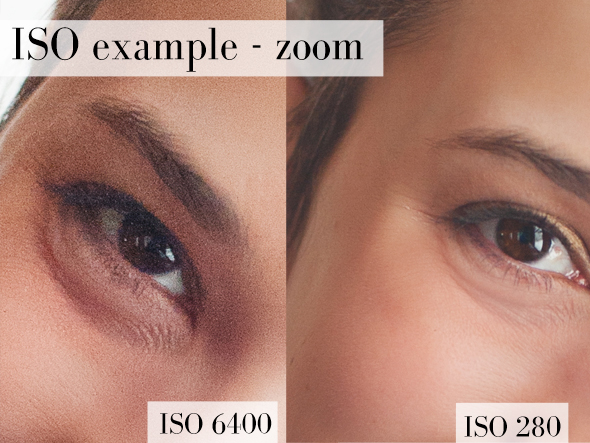
These images may not appear much different from one another. Until you zoom in and reveal the difference in quality caused by the higher ISO. You better believe you’ll see the difference in your prints!
INTRODUCTION TO SHUTTER SPEED
Shutter speed represents how long your shutter will be open. In other words, how quickly the image will be captured. As an example, if you want to freeze a moment in time – such as a running toddler, or suspending a falling snowflake – then you will want a very fast shutter speed. If you want to capture the blur of a train as it speeds by, then you would want a slower shutter speed.
Here’s the catch… the faster the shutter speed, the less light that will be captured. Why does this matter to you? If you are shooting in a low light situation with a high shutter speed – you may end up with a very dark (or even pitch black) photo! Or vice versa, a shutter speed that is too slow in a bright lighting situation would result in a “blown out” or entirely white image.
General rule of thumb…to ensure you capture a sharp image without the aid of a tripod, I recommended shooting at a minimum shutter speed of 1/150 (150th of a second). Toddlers? FASTER! They’re speedy little buggers. Then adjust your ISO and aperture accordingly to keep your image properly exposed.
Note: everyone should have a best friend who will jump to action after you say “ok, shake your head like a crazy person” without question. (love you girl)
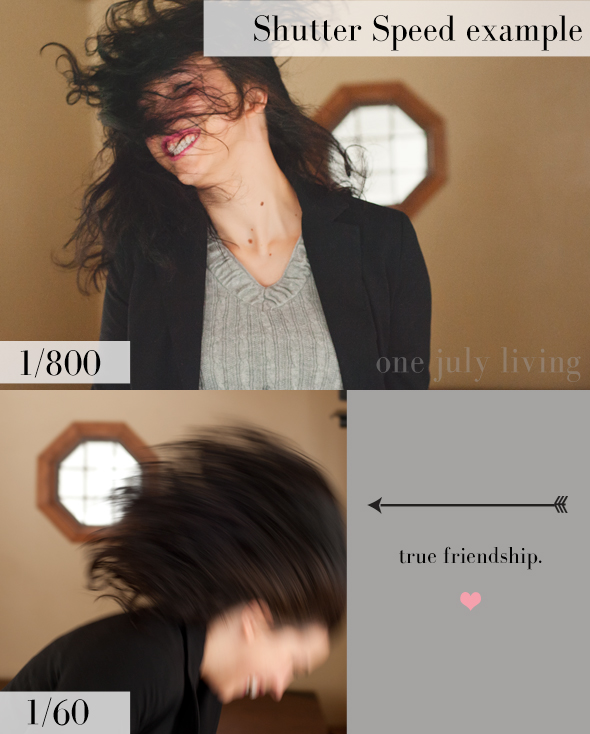
Top image Settings: ISO 4500, shutter speed 1/800, aperture 3.5
Bottom Image Settings: ISO 800, shutter speed 1/60, aperture 3.5
INTRODUCTION TO APERTURE
Aperture is responsible for depth of field.
I often see questions about “how do you create that ‘blurry effect’ in the background?” That is all about aperture.
Here’s the catch… The smaller the number of the aperture setting (more shallow the depth of field) the MORE light will be captured.
The larger the number of the aperture setting (the deeper the depth of field) the LESS the light will be captured.
General rule of thumb…
- If you want to create a blurry background, use a smaller/wider aperture setting (i.e., 1.8-4.0). But don’t go overboard, you may only get the tip of someone’s nose in focus!
- If you want to photograph the latest room you remodeled or a mountain landscape, you will want a larger aperture setting to deepen the depth of field and keep more of the image in focus (not just that lamp that’s closest to you!)

Top image settings: ISO 200, shutter speed 1/1250, aperture 1.8
Bottom image settings: ISO 2200, shutter speed 1/200, aperture 16
Have I lost you? Take a deep breath and don’t worry. I promise, you can do it. Next month we’ll start putting these into practice! First up – APERTURE!
YOUR ASSIGNMENT:
– Read your camera’s instruction manual and learn how to switch your camera to MANUAL mode.
– Read your camera’s instruction manual and learn/practice how to adjust the ISO, Shutter Speed, and Aperture on your camera.
WANT TO JOIN IN ON THE FUN BUT NOT SURE WHAT TO BUY? Check out my investment guide for the photography beginner.

Make sure and PIN this to your photography board for future reference…you know…so when you bust out your camera and completely forget what Jessica just taught us. For that time.

This is a great post, however my head hurts while I’m reading it. I need to read it again SLOWLY I think. Bookmarking for another day for sure!
I’m excited to try this on my camera! Look forward to further post!
This is invaluable information. My blog’s photos are definitely lacking, and I’ve been wanting to improve the quality (I’ve been using my iphone until now, which I’m sure is enough to give a talented photographer a heart attack. I’m sorry!) Thanks so much for sharing!
Thanks so much for this post. Guess who’s grabbing their camera right now!
Thank you for this! Can’t wait to learn more about Aperture.
Ok, I have tried for years to fully understand how to use my camera. I LOVE to take pictures but I’m often disappointed with the results. I have “pinned” this and I’m going to follow along. Thanks so much for doing this.
Thank you for this! I recently bought my first DSLR camera and the only thing I had figured out was aperture..Now I understand ISO and shutter speed…awesome….Also, I am looking into buying a 50mm lens because I have read that it can take great pictures..what is the main difference between all lenses? How do I know which one to buy?
Thank you for this series! I have had my camera for two years now and still have no idea how to use it. I’m already understanding some more thanks to this and am going to go practice and experiment now! Can’t wait until next month’s installment of the series!
this was a great guidance for me! I have a dslr camera, but haven`t really learned much about how to make the best out of it. thanks for learning me some new tricks!
OK – I think I am following. I understand all three separate, but to put them together will probably take some practice because it seems that all three together (maybe except aperature …) have to do with getting light in right? I guess it’s all about practice makes perfect huh? Looking forward to the next lesson and I’m going to open that darn camera manual TONIGHT and learn how to change these 3 settings. Thanks!
Thanks for all the info! I stumbled across your blog on Pinterest. Ahh, I love Pinterest! I am new to the photography world & have a question:
Does it make a difference what gets adjusted first, ISO, shutter speed or aperture? If so what do you recommend setting first?
Thanks!
I always adjust ISO first, but not sure if that is the “correct” way. 🙂 I think once you have your ISO set right you can play with shutter speed and aperture.
Thanks for your response Mandy!
I love this post but am having trouble finding the rest of the series. Can you help? Thanks!!
There is a link at the top of the post inside the grey box. 🙂
I am just getting started in the world of blogging and am really excited about all the things I have been learning about. I am coming to find that pictures are one of the hardest parts of making my posts look nice. I love how this post explains ISO, Shutter Speed, and Aperture in a way that makes a lot of sense as well as explains how they are all related to each other. I definitely need to reread this a few times while testing the various settings on my camera. Thanks for the help!
I’m completely lost ! This is so frustrating. I understand it but then sometimes I don’t!
Love this! This has been so helpful for me! My only question is, how do you know which to adjust first. For example, I went out today to practice and the image looked a little bright, which do I adjust first, the shutter speed or aperture?
Thank you!